Sweets & Snacks
Chocolate Sweet Potato Protein Donuts with Whipped Chocolate Topping
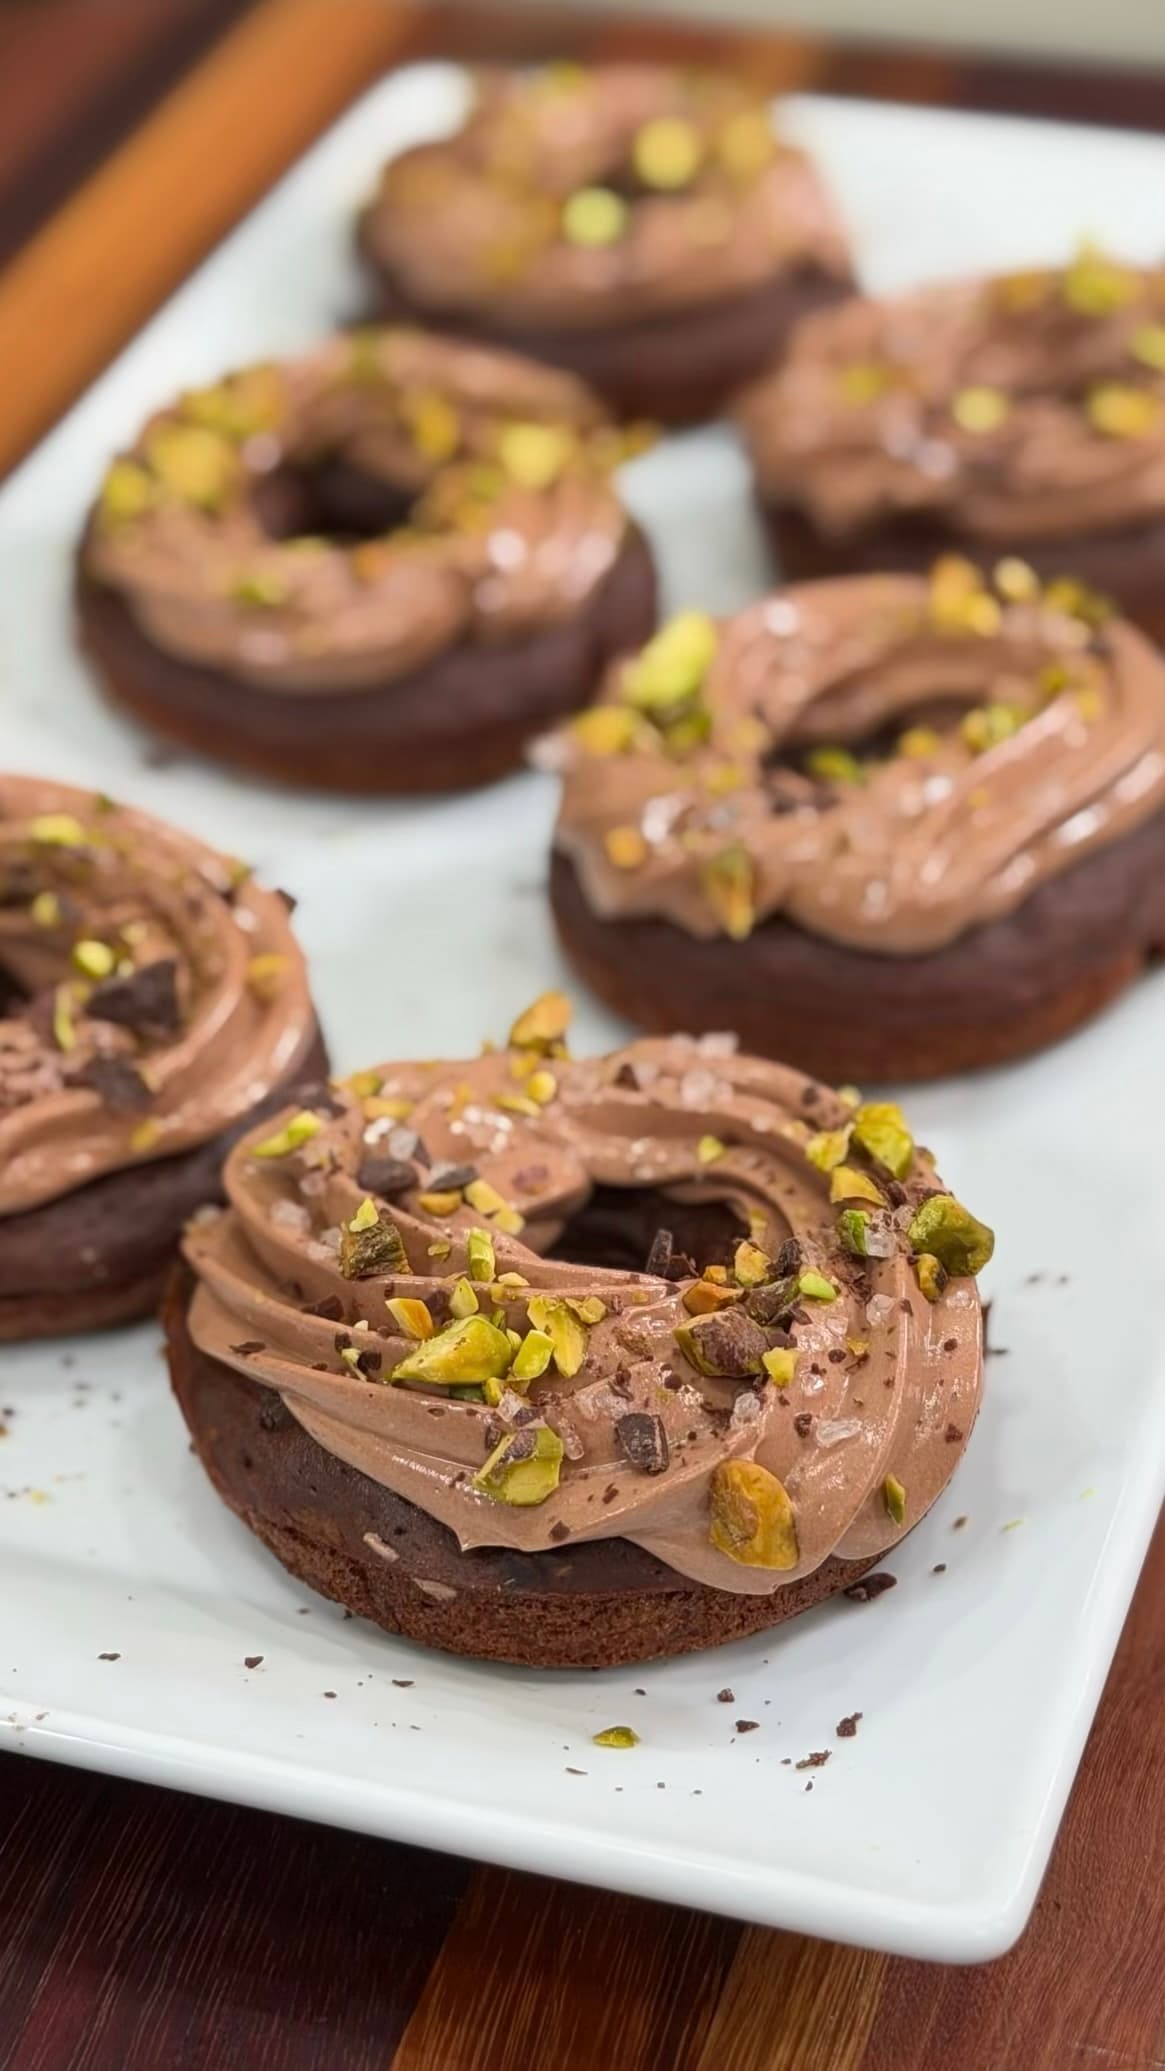
These baked chocolate donuts use sweet potato and banana for moisture and natural sweetness, while eggs, Greek yogurt, and UNJURY protein powder add protein throughout the batter. A fluffy whipped chocolate topping keeps them indulgent, with pistachios adding color and crunch.
Ingredients
- Chocolate Sweet Potato Donuts
- 1 medium sweet potato, enough to yield 1 packed cup cooked flesh, about 225 to 230 grams
- 1 very ripe medium banana
- 2 large eggs
- 1/2 cup plain nonfat Greek yogurt
- 1/4 cup granulated allulose
- 1 teaspoon vanilla extract
- 1/2 cup all-purpose flour
- 1 scoop UNJURY unflavored protein powder, about 27 to 30 grams
- 30 grams unsweetened cacao powder, about 1/3 cup
- 1 teaspoon baking powder
- 1/2 teaspoon baking soda
- 1/4 teaspoon kosher salt
- Whipped Chocolate Topping
- 4 oz whipped cream cheese
- 1/3 cup plain nonfat Greek yogurt, close to room temperature
- 2 oz dark chocolate, finely chopped
- 2 tablespoons granulated allulose
- 1/2 teaspoon vanilla extract
- Pinch kosher salt
- 1 to 2 tablespoons milk, only as needed
- Finish
- Finely chopped unsalted pistachios
- Optional flaky sea salt
- Optional cacao nibs
- Optional crushed freeze-dried raspberries
Directions
- 1
Cook the Sweet Potato
Oven method: Preheat the oven to 400°F. Pierce the sweet potato several times with a fork and place it on a foil- or parchment-lined baking sheet. Roast for 45 to 60 minutes, until completely tender and easily pierced through the center. Let cool until easy to handle, then remove the skin and measure 1 packed cup of cooked sweet potato. Microwave method: Pierce the sweet potato several times with a fork and place it on a microwave-safe plate. Microwave on high for 5 minutes, then turn it over and microwave for another 2 minutes. Continue cooking in 1-minute increments until completely tender, usually 7 to 9 minutes total. Let rest for 5 minutes, then remove the skin and measure 1 packed cup of the cooked flesh. If the sweet potato seems particularly wet, let the flesh sit uncovered for about 5 minutes before using.
- 2
Make the Donut Batter
Preheat or reduce the oven temperature to 350°F and lightly grease your round donut molds. Fit the mixer with the paddle attachment. Add the cooked sweet potato and banana to the mixer bowl and mix on low for about 20 seconds, then increase to medium-low and mix for about 1 minute, until smooth. Stop and scrape down the paddle and bowl. Add the eggs, Greek yogurt, allulose, and vanilla, and mix on medium-low for 45 to 60 seconds, until smooth and creamy. In a separate bowl, whisk together the flour, UNJURY protein powder, cacao powder, baking powder, baking soda, and salt. Add the dry ingredients to the mixer bowl and mix on the lowest speed for about 20 seconds. Stop and scrape down the sides and bottom of the bowl, then mix for another 10 to 15 seconds, just until everything is incorporated. The finished batter should be thick, smooth, and pipeable. Avoid overmixing.
- 3
Fill the Molds
Transfer the batter to a piping bag or large zip-top bag and cut about 3/4 inch from one corner. Pipe the batter evenly into the prepared round molds, filling each about three-quarters full. Smooth the tops with a damp fingertip or the back of a spoon if needed.
- 4
Bake
Bake for 16 to 20 minutes, until the tops spring back when lightly touched. A toothpick inserted into the center should come out with a few moist crumbs rather than completely dry. Let the donuts cool in the molds for about 10 minutes, then carefully remove them and transfer to a wire rack. Cool completely before adding the chocolate topping.
- 5
Melt the Chocolate
Place the finely chopped dark chocolate in a completely dry microwave-safe bowl. Microwave for 20 seconds, then stir well. Continue microwaving in 15-second intervals, stirring thoroughly after each interval. Once about three-quarters of the chocolate has melted, stop microwaving and continue stirring until completely smooth. Let the chocolate cool for 3 to 5 minutes. It should remain fluid but no longer feel hot.
- 6
Whip the Topping
Clean and dry the mixer bowl and switch to the wire whisk attachment. Add the whipped cream cheese and whisk on medium speed for about 30 seconds. Add the Greek yogurt, allulose, vanilla, and salt, and whisk on medium speed for 45 to 60 seconds, until smooth and slightly fluffy. Stir about 2 tbsp of the cream cheese mixture into the melted chocolate until smooth, to bring the two closer in temperature. With the mixer running on low, slowly add the chocolate mixture, then increase to medium speed and whisk for another 45 to 60 seconds, until smooth, fluffy, and evenly chocolate-colored. If the topping is too stiff to pipe or spread, add milk 1 tsp at a time until it is thick enough to hold its shape.
- 7
Top the Donuts
Make sure the donuts are completely cool before adding the topping. To pipe, transfer the whipped chocolate topping to a piping bag fitted with a large round or open-star tip and pipe a generous swirl or ring onto the top of each donut, keeping enough height so the topping looks soft and whipped. To spread by hand, spoon about 1 1/2 to 2 tbsp of topping onto the center of each donut and use a small offset spatula or the back of a spoon to gently spread it toward the edges in short sweeping motions, leaving a little extra height in the center. Finish with chopped pistachios while the topping is still soft, and a very light pinch of flaky sea salt if desired.
Storage
- Store the finished donuts in a covered container in the refrigerator for up to 4 days.
- For the best texture, let refrigerated donuts sit at room temperature for about 10 to 15 minutes before serving.
- The plain donuts can also be frozen for up to 2 months. Thaw completely before topping.
Protein Flip™ Note
- These donuts keep the chocolate, the cake-like texture, and the creamy topping, while adding protein through eggs, Greek yogurt, and UNJURY protein powder. It is the Protein Flip™ approach of adding rather than subtracting: keep the part that makes the food enjoyable, then build more nutrition throughout the recipe around it.
Nutrition
Per 1 serving
Estimated per serving. Actual values vary with brands, substitutions, and portion size. This is general information, not medical or nutrition advice.
Check every ingredient against your own allergies and dietary needs. See our Health & Nutrition Disclaimer.